Quantcast
Channel: Curly Nikki
Viewing all 4836 articles
Browse latest View live

Wanda Is Naturally Glam!

$
0
0


What was your journey like?
I big chopped. I would big chop every year but would never commit to being natural.  The 3 years ago I decided to stick with it.  It was a little difficult until I found YouTube and that was my saving grace.

Had you always embraced your texture? 
Yes, I never had a problem with my texture. I just didn't know how to style it once my hair grew out, so I always rocked a Caesar or very low curls.

READ MORE>>


How did family and friends react to your decision to go natural? What was your response to them?
My friends either loved it or hated.  Most wanted me to go back to the relaxer.  I've always been a type "A" personality so I really didn't care what people thought of my hair.

Describe your hair.
My hair is extremely thick, not very coarse at all. I have very little curl pattern.

What's the craziest thing you've ever done to your hair? 
I once tried to loc my hair, I didn't have a clue and it was a hot mess.

What's your biggest hair related regret? 
Two-strand twisting.

What's your current hair routine? 
I wash about every two weeks. If I decide to wash in-between that time I will co-wash.  I use SheaMoisture product line and a few Jane Carter products.

What's your favorite hairstyle? Where do you get hairstyle inspiration?
My favorite hairstyle is a twist-out.  I'm always on YouTube looking for new styles and I experiment a lot on my own with styles.

Who is your curl crush?  
In the very being of my journey it was Naptural85 and Ebony Clark.

How do you maintain your hair at night? 
I sleep with a satin bonnet.

How do you maintain healthy length? 
I keep my hair moisturized and trim often.

What's the best thing about being natural? 
The best thing about being natural, is being proud of who you are and rockin' your God given beauty.

Where can folks find you on the web? 
https://m.facebook.com/NaturallyMature2013

Going Natural- The Beginner's Guide

$
0
0

by Keora Bernard

When I first began pondering my decision to go natural, I did several 'prep myself' sessions. This meant I inundated myself with everything natural. In retrospect, these 'prep myself' sessions were good because they gave me some information about what to expect after my big chop and what products to use on my hair. On the other hand, these sessions served as somewhat of a wish-list for what I thought would surely happen during my process. The following are my tips for how to deal with the unexpected when going natural:

Read On!>>>

Dealing with Damage. While going natural is a beautiful thing, there are often unrealistic expectations of how natural hair should feel and look. Every natural’s head is different and contrary to popular belief, not everyone ends up with shiny, bouncy ringlets of hair. Even more significant, some naturals continue to deal with the after effects of previous chemical and heat usage. In essence, give your hair time to recover. It has probably been through a lot over the past several years.

Drier than a Dessert. Returning back to our curly textured hair will be liberating but also frustrating. Many of us were accustomed to perming our hair and how it functioned in a relaxed state. Becoming natural requires you to relearn everything about your hair and how it operates. The curves and bends make it difficult for moisture to travel down our hair shaft which causes dryness. Understanding why it happens and how to properly moisturize your hair will save you heaps of frustration and bewilderment.

Forget the Stylist. I fondly remember the days of getting my hair freshly permed by my childhood stylist. Back then I loved the look, and my edges were always nicely laid by a pomade or gel. However, going natural means YouTube becomes your new hairstylist. It’s either that or pay a ridiculous amount of money to get a style you can do on your own. Embrace doing things for yourself and the tricks you learn along the way.

Slow Motion for Me. During our permed days, we should have adopted a motto that said, “Wash, set, and go!” This process may have appeared long to us but if we knew how much longer it would take to style our natural hair, we would have been more grateful. Styling natural hair takes considerably longer because of its density and propensity to tangle. Regardless, it’s much healthier and fuller than our permed hair was. If you’re feeling overwhelmed then break everything down in stages, and take breaks when needed.

Try by Trial and Error. During the days of Luster’s Pink Lotion and Dax, we were all pretty much using the same products. In its relaxed state, our hair all looked the same. However, now we have a variety of textures and hair concerns. This means that our natural hair may appreciate a completely different product than the next natural head. At the beginning, try our different techniques and products and then stick with the one that works for you.

Caring for natural hair isn’t a cakewalk but I think it’s a general consensus that naturals don’t desire to go back to relaxers. Deciding to go natural was the best decision of my life, giving me confidence in my Black features and overall power as a woman. On the other hand, going natural has a very feminine element to it. It shows us how to relinquish control and nurture what is before us. Love on those kinks, curls, and coils because your deepest essence supports it.

8 Tips to Detangle Your Natural Hair without Ripping it Out

$
0
0

by Precious of PreciousHenshaw.com

Detangling is a crucial part of all hair care. Detangling is simply using a hair-care tool to comb or brush through your hair. This helps to remove tangles and shed hairs that can cause matting, knots, and ultimately, breakage. Detangling can also help with washing the hair, styling the hair, and distributing products throughout the hair.

Many naturals have hair growth goals, but are struggling with retaining length. Learning to properly detangle natural hair will ensure that you are not just breaking it off. It will also help with overall healthy hair care, as improper detangling can result in split ends and damaged cuticles. Here are some tips on detangling your hair without ripping it out!

Read On!>>>


Wet and Condition Your Hair
Try wetting your hair thoroughly, then applying a generous amount of a slippery conditioner to your hair. When the hair is damp and lots of conditioner is applied, it is in a very ideal state for detangling. The water and conditioner provide lubrication and slip to the hair, which will make it super easy to detangle. Much like car parts need lubrication to move smoothly, your hair needs lubrication in order for your comb or brush to glide through. The more slippery your hair is, the more easily your comb or brush will go through it. Wet hair with lots of slippery conditioner in it can make for easy, breezy detangling. Just be sure to be very gentle with your hair, as wet hair is very weak and can break easily.

Detangle in sections
After my hair is nice and lubricated, I like to separate it into about 6-8 sections. Detangling your hair in sections can make life so much easier. Focusing on one section at a time is much less stressful than trying to detangle your whole head at once, and it ensures that you’re getting all of the parts of your hair. Detangling in sections also enables you to separate the hair you’ve already detangled from the hair that still needs to be detangled. You can use plastic hair clamps or duck bill clips to secure your sections, and make even smaller sections if needed. It is always a good idea to twist or braid the section after you are finished detangling it, to prevent it from tangling up again!

 India from MyNaturalSistas

Use a Proper Comb or Brush
Combs and brushes are great for detangling, but some combs and brushes are better than others. I recommend using a wide-tooth comb or a brush with hard, wide bristles and a rubber base. Combs with tiny teeth are not as easy to detangle with as wide-tooth combs, and can cause more breakage than necessary. Invest in combs with teeth ½ an inch apart or wider.

Boar bristle brushes are not very good for detangling curls and kinks. The tiny, soft bristles tend to catch onto the hair and cause snagging and breakage. Instead, try using a brush with wide, plastic bristles and a rubber base. The plastic bristles won’t catch onto your hair, and the rubber base bends to accommodate your hair, making for smooth detangling. The Denman Brush is an example of this type of brush. Avoid using brushes with balls at the end of the bristles, as curly hair can catch onto the ends. Example of what not to use below:


Combs are great for detangling for the purpose of separating the hairs from each other and getting rid of mats and tangles. Brushes are great for the same thing, but they can also remove shed hairs! The average head sheds 50-100 hairs a day, and these shed hairs can tangle up with the rest of your hair. Using a brush with a rubber base can remove shed hairs while detangling your hair, so it’s a really great tool to have!


Start From The Ends and Work Your Way Up
Don’t begin detangling from the middle or the root of your hair! You can’t detangle downward from the middle if the ends below it are tangled. Instead, begin detangling from the ends of the hair. Hold the ends of your hair with one hand and detangle with the other hand. Once the very end is detangled, begin detangling an inch above that. Continue detangling from a point higher than the one before until the section is completely detangled!

Try Finger Detangling Before Using a Brush or a Comb
Finger detangling is using your fingers like a comb, and separating strands of hair. Detangling with your fingers before using a brush or a comb can be great because you can feel major knots and tangles with your fingers and pull them apart gently. Take the section of hair and first pull the hairs apart gently with your fingers, separating any tangles. Then, comb your hair with your fingers! Finger detangling makes using the comb or brush much easier afterward. I find that finger detangling on its own isn't very thorough, especially when it comes to removing shed hairs, so it is not something I solely rely on. Definitely use a comb or brush (or both if you want) at some point to ensure that you are separating strands well and removing shed hairs.


Detangle Before and After Shampooing
Shampoo tends to make the hairs stick together, so you should be sure that the hair is as separated as possible and has the least amount of shed hairs as possible before shampooing. You don’t want to have tangles in the hair and then add even more tangles by shampooing! You also want to re-separate the hair after shampooing. After rinsing out the shampoo, add conditioner to your hair and detangle!

Detangling For Styling and Product Distribution
It is easier to manipulate and style detangled hair, so be sure to detangle your hair before styling it! Don’t forget to thoroughly detangle your hair after taking down the style too, especially if you wore the style for a long time (like braids or twists), since shed hair will be trapped in the rest of your hair.
Combing or brushing your hair after applying a hair product can help distribute the product through your hair. Especially with thick, creamy products that are a little harder to apply, using a comb or brush can help get the product through. Distribute the product in sections to ensure that you are reaching all parts of your hair.

Be Gentle
Always be gentle when detangling your hair. Rough detangling will cause nothing but pain, breakage, and damage. Detangle slowly and carefully, especially at the ends of your hair where it is the oldest and weakest. Your hair is awesome! Treat it like it is!

How do you detangle your hair? What are your favorite products, hair care tools, and methods for detangling?

This article was originally published in 2013 and was updated for grammar and clarity. 

Tips on How to Wash and Reuse Marley Hair

$
0
0


Protective styling is a large part of what helps naturalistas achieve and maintain length. Some of the most coveted protective styles that have become popular are Marley Twists, Crochet Braids, and the timelessness and creativity of Box Braids. Unfortunately, not all of us have beautiful textured strands cascading down our backs so we turn to extensions. Having extensions to achieve length is great but what happens after our protective style is 3 to 4 weeks old.

 QUESTION: Do you throw your Marley hair away or can it survive another round of styling?
The answer: Marley braiding hair can be washed and reused for multiple uses!
After emptying out our pockets to buy multiple packs of Marley braiding hair it is hard to let go of such a costly investment. And most of all we should always want to get the most use out of our purchase before its time to throw it to the wasteside. Here is how to wash Marley or Kanekalon braiding/twisting hair for fresh reusable hair.

Method #1: The Conditioner Cleanse

What you'll need
  • Conditioner
  • Hot Water
  • Bowl
Directions
  1. Braid the marley hair in sections to prevent tangling.
  2. Put hot water and conditioner in the bowl.
  3. Place braiding sections into the bowl.
  4. Rub the braids together to loosen oils and dirt that may be on the hair.
  5. Rinse and untwist.
  6. Lay flat to dry.

Method #2: Light Cleansing 

What you'll need
  • Shampoo
  • Conditioner
  • Bathtub or large washing area
Directions
  1. Tie off bundle sections off center to ensure cleansing of the entire length of the bundle
  2. Fill the bathtub up with warm water and add shampoo. *Bathtub does not need to be filled all the way*
  3. Add the hair bundles in and allow them to soak for 10-15 minutes
  4. Massage and lightly scrub the bundles to rid the braiding hair of oils and dirts that have attached to the hair.
*Be sure to wash bundles one at a time to prevent frustration and knotting* 
  1. Once cleansed and rinsed, lay flat and apply conditioner
  2. Rinse out conditioner with cold water; allow hair to air dry.
Some brands of Marley braiding hair (or any faux hair extension) may contain preservative chemicals that are incredibly harsh for people with sensitive scalps. Because an irritable scalp is something nobody wants to go through there’s a cleansing method for that:

Method #3: Cleansing for Sensitive Scalp

What you'll need
  • Shampoo
  • Conditioner
  • Apple Cider Vinegar
  • Bathtub or large washing area
Directions
  1. Place hair in loose sectioned bundles
  2. Fill the bathtub with warm water, not scalding hot water
  3. Mix shampoo into water so it does not sink directly to the bottom
  4. Allow the hair bundles to sit in the shampoo mixture for 10 minutes
  5. Lightly scrub and massage the bundles against each other. Rinse
  6. Squeeze out excess water and add conditioner. Rinse
  7. Holding the hair in the middle of the bundle, rinse with warm apple cider vinegar
  8. Rinse with cold water and hang to dry.

A few things to keep in mind

Always air dry
Remember that the Marley braiding hair is a fiber similar to Kankelon hair and will melt with the use of high heat. Using a hair dryer will cause the hair to frizz tremendously and lose the texture it was meant to have.Cool it down

Remember to use cool to warm water when rinsing the braiding hair out. Just like our own hair, using hot water will cause frizz. The only difference is that the frizz on synthetic hair is hard to fix if at all possible.

Sexy Voluminous Curl with Flexi Rods

$
0
0


It's crazy that I used to struggle with flexi rods. I think I tried too hard to keep the hair taut and I tried to roll the hair from the tips upwards like you would do for a typical roller set. Well that was last year and I no longer use that method! 2015 has been all about so many successful flexi rod sets. In this video, I demonstrate how I achieve fabulous, sexy, voluminous curls. Enjoy! 
 
Watch Now!>>>


The Benefits of Steaming Natural Hair

$
0
0


 by Michelle Thames of HappilyEverNatural.com

This past weekend I got my hair blown out because it was time for a trim. I have not had my hair professionally straightened and trimmed since November of last year! I know that’s shocking to some, LOL! My birthday is Friday and I wanted to let my hair down!

Read On!>>

I visited The Chicago Curl Collective, and Daria laid her hands on my hair. I have A LOT of hair! When it comes to straightening it, that is one job I do not tackle on my own. Daria and I began to talk about the benefits of steaming your natural hair, and why you should add this step with your deep conditioning to your regimen at least once a month. I learned some valuable information about steaming that I wanted to share. I think it is very beneficial and can help your hair in many ways. I am all about having not only bomb twist-outs (lol), but overall health hair.

Steaming your hair helps to replenish what may be sucked out during our every day routines. Steaming also helps aid in greater moisture retention, which is very important. Steaming allows for deeper penetration into the cortex of the hair strand and you’ll see an overall improvement in pliability and elasticity of the hair strands (ability to manipulate and stretch the hair strands without them snapping off and breaking) as well as an increase in hydration.

When rinsing the conditioner from your hair you will want to make your water as cool or as cold as you can stand it! This is a step that I fail to complete sometimes, but it is very important! Doing this after steaming helps close the cuticle layers back down and seals everything in.

BOOM! The greatest benefit is that steaming is 5x’s more effective in restoring moisture to dehydrated hair than conditioner only or even conditioner and sitting under a hooded dryer. And that ladies, is awesome sauce!

I have a handheld steamer that I LOVE (Q-Redew), I am also looking into purchasing a standing steamer like the ones used in professional salons. I just love the way my hair feels when I steam! Rejuvenated and ready to conquer the world!

Do you use a steamer? Do you think it helps your hair in any way? Thoughts?

How to Avoid Heat Damage

$
0
0
 Photo Courtesy of Maria Antoinette


The number one self-inflicted hair related issue that I have seen as a licensed cosmetologist is heat damage. Heat damage does not discriminate by hair type. The tips that I have complied below can decrease the potential of heat damage and therefore help you feel more comfortable when using heat tools.

Read On!>>>

Understanding heat and its effects

Before delving into heat damage prevention, let’s address what heat does to the hair when the proper precautions are not taken. When hair is exposed to heat higher than 130 degrees Celsius (about 265 degrees Fahrenheit), your hair can respond in many undesirable ways.  Here are three of the more common effects of heat damage:
  • Breakdown of the cuticle of the shaft—this leads to split ends and major frizz
  • Removal of internal moisture from the hair – this leads to dry and brittle hair
  • Breakdown of the hair’s cortex—this is where the hair’s pigment and elasticity lives
So, if you have ever noticed stiff hay-like or flat lackluster hair that breaks with ease (and those ungodly split ends) after heat styling your hair this post is for you.

Applying heat to wet hair in 7 steps

Now that we have covered heat and its effects, here are seven steps to take before applying heat to your hair:
  1. Shampoo your hair with a cleansing shampoo, rinse, and remove as must water as possible.
  2. Apply conditioner and rinse.
  3. Remove as must water as possible with a t-shirt and then add leave-in conditioner
  4. Let your hair air-dry for a few minutes. Allowing your hair to dry a little prior to applying heat helps the cuticle to close, trapping more moisture inside of the hair’s cortex. Type 2 hair: let air dry hair to 60-70%. Type 3 and Type 4 hair: braid and or two-strand twist your hair into 4-6 sections and let your hair air-dry in those braids/twist until 50-60%. This will elongate your curls and help in the stretching process.  
  5. Apply your heat protectant from roots to ends—this should be done for each section. Apply heat protectant to each section. Applying heat protectant to damp hair also acts as a filler and sealant to the hair’s cuticle, resulting in more protection for the hair shaft.
  6. Blow-dry your hair with a nozzle attachment in small, easy-to-work sections. This will control the hair and prevent damage from tangles and getting too rough. Repeat until you have dried all of your hair.
  7. Conclude with a cool blast to ensure that the hair does not start to prematurely revert. Cool air on hot hair seals the bond that was created when blow-drying allowing the blow-dry to be more effective. Now you can proceed to style.
If you are going style your hair with a heat tool like a flat-iron or curling iron apply a styling based heat protectant.
Many are unaware about the benefits of using heat protectant prior to flat-ironing or curling our hair with a heating tool. It is equally important to use a heat protectant before blow-drying. Heat from a blow-dryer is just as intense and can cause damage equivalent to a heating tool.  

While seven steps may look laborious, think of it as investing in your hair. Like all things in life, it is always best to use heat in moderation. With these steps I found that my clients experienced less heat damage and had longer wear of their heat styles.


How do you reduce the risk for heat damage?

The Two Ingredients that Make Your Conditioner Work

$
0
0


 by Susan Walker of Earthtones Naturalsvia Three Naturals

In a previous post we discussed the importance of conditioners to your hair care regimen. It is, in my opinion, the most important part. Given the role this product has in maintaining the health of our hair, we need to examine what we’ll likely find in conditioners that make them so important.

The main conditioning agent in conditioner is what’s called a cationic surfactant. Cations are positively charged particles and they are attracted to our negatively charged strands. They adsorb onto our hair meaning that they sit on our hair; they don’t penetrate. Additionally, they resist being washed off by water alone. They improve the hair’s softness, aid in detangling, help to seal the cuticle and make the hair more manageable.

Read On>>>

Common cationic surfactants include:
• Behentrimonium methosulfate
• Cetrimonium chloride
• Cetrimonium bromide
• Stearalkonium Chloride

Other cationic ingredients include the polymers. A polymer is a large molecule composed of repeating structural units. A cationic polymer therefore is a positively charged polymer used in skincare and haircare to increase conditioning and softness. Due to the positive charge these types of polymers will adsorb to our skin and hair, forming films and resulting in the following to the hair after the product is rinsed from the hair:

• Increased moisture
• Enhanced softness
• More flattened (as opposed to lifted) cuticles
• Increased shine

Some cationic polymers are:
• Polyquaternium 7
• Polyquaternium 10
• Polyquaternium 4
• Polyquat 44
• Honeyquat

Do any of the conditioners you use contain any of the above ingredients?

How does your hair look and feel after you use them?

CN Says:

For more reading on conditioners and ingredients, check out the below:

Secrets to Super Slippery Conditioners

This article was originally published in July 2013 and has recently been updated for grammar and clarity. 


Kanisha Is Naturally Glam!

$
0
0

Tell me about yourself!
Hey! My name is Kanisha Pitchford. I'm 22 years old, and I am an Educational Psychology major at Mississippi State University.

Were you a transitioner or a Big Chopper? What was your journey like?
I transitioned for 1 year and 5 months. My transition was not hard at all because I used a lot of protective styles such as twists and sew ins to help the process go by smoothly. When I was not protective styling, I mostly did braid outs and bantu knots, or if I was feeling lazy I would just put my hair in a bun. My initial goal was to transition for at least 2 years, but I was over the dead ends and felt I was ready, so I went for it and I'm absolutely loving it so far!

READ MORE>>


Had you always embraced your texture?
It wasn't too hard to embrace my texture, because I transitioned for so long. When I finally cut all my perm off my reaction was hilarious, I couldn't believe a fro actually looked cute on me!! I loved my kinky curly/coily texture, but although I loved it I was nervous to go into work the next day because I didn't know what everyone would think, seeing as how I work in a corporate style office. I sent pictures to my mom, boyfriend and posted a few on Facebook and everyone couldn't believe I finally did the cut. Everyone at work liked it as well, so with all the support around me embracing my texture was not hard at all!

How did family and friends react to your decision to go natural? What was your response to them? 
I did tons of research before finally deciding to go natural. I honestly think I may have researched and pondered on it for at least 1-2 years. My first year at MSU, I told some friends of mine I was going to stop getting perms and they honestly didn't think I would do it, and I love proving people wrong! I got my last perm that December and of course you get a few comments here and there from strangers, but my family and friends were very supportive!


Describe your hair (fine or coarse, thin or thick, highly porous, low, etc.)
My hair is, very thick, Kinky, and coily, It has major shrinkage and it thrives off of water.

What’s the craziest thing you’ve ever done to your hair?
The craziest thing I've ever done to my hair would have to be the big chop, it's the boldest thing I've ever done because I'm too much of a chicken to experiment too much with my hair. I do plan to experiment with color sometime soon because I'm obsessed with shades of red.

What’s your biggest hair related regret?
My biggest hair related regret is being too afraid to transition sooner.

What's your current hair routine? How often do you wash, condition, and style? Favorite products! Deets!
I wash my hair once a week. I use Eden body works Jojoba Monoi all natural shampoo or SheaMoisture Super fruit Complex 10 in 1 Renewal Shampoo and then deep condition with whatever deep conditioner I have available at the time, I really love Eden Body Works Deep Conditioner, but right now I'm using SheaMoisture Raw Shea butter Deep Treatment Masque, which is amazing as well. I let the deep conditioner sit on my hair for about 45 minutes to an hour, then rinse. I then apply a leave in conditioner, right now I use African Prides Shea Butter Miracle moisture intense leave in conditioner, I've been using this product for years and my hair loves it. I then continue by adding some type of oil to seal in moisture, I like to use Jojoba oil. Every other week I co-wash instead of using shampoo. The products I use may change often because I'm still experimenting with them, but I ALWAYS deep condition each time I wash.


What’s your favorite hairstyle? Where do you get hairstyle inspiration?
My favorite hairstyle would have to be protective styles, such as braids and sew ins, but when I'm not protective styling I like to do braid outs and twist outs or anything that can give me lots of volume! I love big hair! I get most of my inspiration from YouTube and Pinterest.

Who is your curl crush?
I have several from Instagram: _CHANDAPANDA_, DONEDO, __LIONNESS
YouTube: PrettieMajor, Nikkimae2003, Mo Knows Hair, Mini Marley, Janae Mason
and Kimberly Elise

How do you maintain your hair at night?
My night time routine is pretty simple. I spritz my hair with water, and add a moisturizer to it if needed. I then braid or twist my hair, depends on what look I'm going for the next day and I always cover it with a satin bonnet.


How do you maintain healthy length?
MOISTURIZE, PROTECTIVE STYLE, AND HEALTHY ENDS.

What's the best thing about being natural?
I feel like the best thing about being natural is just embracing what God blessed you with and feeling beautiful without altering yourself to fit into a certain standard. I also feel that naturals are more conscious about the health of our hair because we're learning more about how to take care of it and this can also teach us how to take care of our bodies as a whole.


Where can folks find you on the web?
Instagram: Southern_bread
I'm also working on a YouTube channel: Naturally_kayp

When Your Default Emotion is Sadness

$
0
0


"Creation is an extension of thought. Think lack and get lack. Think abundance and you get abundance." - Marianne Williamson

I can't get enough positive affirmation.  Can't get enough truth and stripped down honesty and inspiration. I'm never satisfied.  Always looking for growth and life lessons and proof of grace.  Because I have always been drawn to sad things and melancholy, anything emotional and heart-wrenching, so I instinctively seek to balance that out.  With meaning and enlightening ideas.  Faith and creativity.  This is the only way I know how to live and thrive.  I'm not always happy, but I'm always hopeful.

Read On!>>>


Because if you're like me, maybe you're drawn to sad things too and you've wondered how to not think so much about struggle and grief and loss.  Uneasy, bothered...anxious thoughts.  The kind that distract you from gratitude and grace and make it hard to function at the level you want.  And if you're like me, you know that your thoughts create your life and if you're thinking about awful things all the time, then what effect is that having on the life you're living?

Writing is a creative way to change your thoughts.  To program yourself to think differently and change the way your mind processes your feelings.  You've got to honor the way you feel, but you can manage your emotions (how you react to those feelings) by observing yourself and actively choosing where you want your energy to go.

One of the ways I use writing to do this is through my Limitations and Affirmations exercise.  Essentially, it's becoming your own cheerleader.  Pulling out the inspiration that is already inside of you, but sometimes gets buried beneath the negative thoughts.  So you write your fear or limiting thought as a statement and then you write positive statements to counter it.  It doesn't make the fearful thoughts go away forever, but what it does is it triggers your mind to work for you, not against you, and it distracts you from the negative thought patterns that can so easily take over when left unchecked.

........................................................................................................................................................................................

A few examples:

“What if I believe, believe, believe and still something terrible happens?  It’s better to be realistic and prepare for the worst.”

“Be a prisoner of hope.” I read that in one of Joel Osteen's books.  There are facts and figures and probabilities but when you are a prisoner of hope, none of those things can shake you. Sure, make your plans and protect yourself, but in your mind you are wise to always expect positive outcomes. What you focus on always grows. Grow your faith. Grow your confidence.


“I don’t have anything to say that hasn’t been said before.”

Your perspective matters.  You have a certain slant that you bring to everything.  Take time to figure out what that is, how to develop and express it.  Explore what you think, what intrigues you, what you agree with and disagree with.  Don't underestimate your relevance and don't stifle your questions.  These are the breadcrumbs that will lead you through a purposeful life.


“No one ever understands my point of view, so I'm sure I am the only one who feels the way I do.”

Don’t measure yourself according to the way the world receives you. Start with a core, fundamental appreciation for your life and the way your Creator made you, and build upon that. Authentic power comes from being yourself regardless of outside validation. This kind of power is magnetic and will both attract and polarize people and that’s okay. If everyone loves you and no one disagrees with you ever, then you are probably watering yourself down too much.


“The vision I have for myself scares me.  It's unattainable. I'm sure to mess it up. There’s no way I can get from here to there.”

"True desire in the heart for anything good, is God's proof to you that it's yours already.  You already have it.  Claim it."   Denzel Washington.  Admit to yourself what you really want and believe that desire is in you for a reason.  If you don't trust in your own inner voice, you can easily go through life believing all the lies and limitations and miseries you absorb from the world.  When you feel doubt, fear, anxiety, it is a sign that you are getting closer. Push through it. Don’t think about the distance. Think about how it will feel to live a life that shuns fear.


“I'm so used to struggling and making things difficult for myself.  I can't change.  I'm just made this way.”

You are the whole, not the pieces.  You are not your fears, your anger, your grief, your pain.  You are not the mistakes you've made in the past and you are not your limiting beliefs about the future.  No matter what happens, bring yourself back to the wholeness of who you are.  Someone hurts you?  Let it hurt, then come back to the whole.  You get sick?  Feel the fear and the pain, and keep coming back to the whole.  Think of your wholeness as your soul, the light inside that is not of this world.   You were made whole.  You are whole.  You're just having a human experience.  Remember that.

....................................................................................................................................................................................

Our emotions are demanding, but once we have a better understanding of where they come from and how to channel them, we can find more ease in our journeys.  Will you try this exercise?   Give it a chance?    If this resonates with you, I'm working on something special that I'll be ready to share on October 1.  Be sure to subscribe so you don't miss it!

Love you long time.  Be sure to connect with me below before you go.  Stay in the light.  xo

The Best Oils for Fine, Natural Hair

$
0
0

 
Photo Courtesy of Craving Yellow

I know what you are probably thinking after reading that title. Should a woman with fine hair use oils? Everywhere you look in the hair care world, the answer seems to be, “not really.” Well, I’d like to disagree. Women with fine hair can use oils to improve their hair’s health. Before we dive into this topic, let's make sure that we get some key definitions out of the way. 

Read On!>>>

What is fine hair?
The natural hair community has several hair typing systems that help us better understand our manes. Two naturalistas with a very similar curl pattern might have a very different head of hair, simply because of the width of their strands. Natural hair varies according to curl patterns, porosity, and width.

Hair width is the average diameter of one’s strands. There are generally three types of hair widths: fine, medium, and coarse. The term “fine hair refers to hair that has a small circumference or that has a small diameter. Fine hair is mainly a dependent on your genetics, and all hair types, regardless of their curl pattern can have fine hair.

Is fine hair the same as thin hair?

No, fine hair is not necessarily thin hair. The term “thin” hair refers to hair density and not hair width. Thin hair means that one has few hair follicles per square inch. A fine-haired naturalista can have a full mane consisting of strands that are small in diameter. 

What are the characteristics of fine hair?

  • Fine hair might appear very full when washed and air-dried, but falls flat and limp when straightened or blow-dried.
  • Fine hair is easily weighed down by heavy oils, creams, and butters.
  • Fine hair is fragile and easily prone to breakage when overmanipulated.
  • Fine hair takes easily to color or dye.
  • Fine hair usually doesn’t hold a hairstyle too well.

What oils work best for fine hair?

As fine hair tends to get weighed down by products, you’d be better off using products that are quickly absorbed into the strand and that do not leave a heavy coating. Argan oil, almond oil, and jojoba oil do not leave a greasy residue our fine strands.
  • Argan oil is a light plant-based oil high in vitamin E and antioxidants, which help treat and repair damaged strands. 
  • Almond oil is one of the lightest drupe oils and is high in essential fats, proteins and magnesium. Both oils are easily absorbed into our strands and when applied modestly, do not weigh down fine hair.
  • Jojoba oil is actually a wax ester that is used as a non-greasy, moisturizing hair oil. It is the most similar to the sebum produced by the sebaceous glands in your scalp.

Protective and Restorative

Since fine hair is easily prone to mechanical damage, it is beneficial to use oils that have protective, strengthening, and restorative properties. Avocado oil and grapeseed oil can actively work to protect fine hair from environmental or mechanical damage.
  • Avocado oil is high in monosaturated fats, which nourish, moisturize and strengthen hair strands, improving the way they look and protecting them from environmental damage. 
  • Grapeseed oil is non-greasy, odorless, and colorless. Like avocado oil, grapeseed oil is high in linoleic acid, an essential fatty acid that helps to improve our hair’s elasticity. 

How should you use these oils?

Hot oil treatment

Heat 2 tablespoons of almond or avocado oil . Apply sparingly to the length of your hair and focus on the ends, which are the most delicate. Massage gently into your scalp for several minutes. Allow to sit for 15 min. Proceed to shampoo. Remember, heated oils are better absorbed into our strands and do not leave a heavy coating. All curly hair types with fine hair can benefit from this method.

Sealant

Fine hair is more prone to mechanical damage than other hair widths. Therefore you’ll need to have your LOC method on lock. Use three to four drops of argan oil. Rub it in your palms to heat it up. Dab it sparingly along the length of your hair. Remember to apply your sealant sparingly – there’s no need to slather oils onto your scalp. This will leave your hair weighed down. Type 4 textures with fine hair will benefit most from this technique as their curl pattern is most prone to losing moisture.

Pre-poo or overnight treatment

Pre-poo treatments can aid to keep our hair strong and moisturized, as well as to prepare our hair for wash day. Heat 2 tablespoons of avocado or grapeseed oil. Rub it onto your strands from tip to root. Only saturate your strands if you are using a clarifying shampoo the next day. Don your plastic cap and cover with your satin cap. Type 2 textures with fine strands can best benefit from a pre-poo instead of a sealant, as it does not require as much oil as a hot oil treatment and will be cleansed off the hair. This will eliminate any trepidation about your hair being weighed down.

Do you have fine hair? Have you used oils in your hair regimen? What’s your experience been? Leave us a note below, and let us know your thoughts! 

Instant Relief for Your Itchy Scalp

$
0
0
gettyimages

by Emilia Obiekea of AdoreBotanicals.com

Many of us suffer from scalp irritations. This can be something that you have always dealt with or only occur at the start of cooler seasons. While this can be normal...it is still aggravating. This is my quick resolve for an itchy scalp. No need to wait for a full wash day to get some relief. This can be done anytime.


Supplies
1 spray bottle
 1 funnel

Ingredients
1 oz apple cider vinegar (acv)
10 drops of peppermint essential oil
6 drops of grapefruit essential oil
6-8 oz distilled water

Steps
  • Add everything to a spray bottle.
  • Shake well.
  • Part hair to expose the scalp.
  • Spray the scalp directly.
  • Massage the scalp with the pads of your finger for a minute or two.
  • Rinse well with moderately warm water.
  • Final rinse with cool water.
*Be sure to avoid getting the solution into your eyes.
Helpful Tips
  • Avoid using leave in conditioners, stylers, gels and other products too closely to the roots.
  • Let the natural sebum (oil) your scalp produces have time to coat the scalp. The scalp is stimulated by massaging it. It also encourages sebum production as well as aids in distribution.
  • If your scalp does not product enough on its own be sure to oil it. Use an oil that is soothing and aids in deterring your itchy scalp. 
For lasting relief I like to do this treatment then follow up with Nourishing Scalp Nectar. It is soothing, full of wonderful infused oils to keep the scalp in its best condition. Learn more here.

SHOW AND TELL- FIERCE FRIDAY!

$
0
0
Hola Chicas!
Fierce Friday is a way to celebrate our natural hair, displaying our dopest styles and best hair days... for inspiration and motivation. Wanna be featured? All you have to do is upload your favorite pics to Instagram with the tags #FierceFriday and #CurlyNikki. Be sure to share a brief description of the style, where you were headed, why you felt amazing, etc.!
 I'm from Iowa and we do not have many naturals here amongst all this corn honey. I'm 45 and started my journal late in life, but because of bloggers like you, my hair is as healthy as it's every been. 
-Toiane


During my transition from relaxed hair I relied heavily of the support of this blog.
-Maya Walton

-Eseohen


Blended install with kinky curly hair #kenziekurlz Top left is clients natural hair before the install @sewyayamua

Love my purple crush like what you see. @stylebylynise

When you take out your 2 french braids and fluff your hair out yasssss!!!! #hunty #naturalhair #braidout #naturalista #bighairdontcare #mac #curlynikki #healthy_hair_journey @itsyonaenae


About to run some errands on this lovely Friday! Pulled the curls up with some almond oil... Been using almond oil on my skin too...no makeup,no filter... Just a little bit of mascara.. Lol! #fiercefriday #curlynikki @latinag5

Do you. @_cebelamour_

Transitioning to Natural Hair Without a Big Chop

$
0
0

by Audrey Sivasothy of The Science of Black Hair

Going from relaxed to natural hair can be an exciting, liberating experience, and there are two basic ways to get there. The fastest, no nonsense way to go natural is by simply cutting off all the relaxed hair in one fell swoop, or big chopping. But big chopping can require a strength that not everyone is equipped with at the outset of a hair care journey. For some, deliberate transitioning complete with mini chops is a necessary part of the “back to natural” process. And, if we really look at it, everyone who makes the journey must transition. Whether you big chop on day one of your thought, or a year after the initial thought, transitioning always starts with the mind well before any actionable steps are taken. In some circles, however, transitioning— especially long term transitioning, is seen as a sign of weakness. I argue, quite the contrary!

Read On>>>
Those of us who’ve crossed that river will tell you that going natural is not just a physical exercise— it is a mental one as well. If the mental is not aligned with the physical, the physical will soon realign with the mental— and you’ll be back at square one. We must always remain sensitive to the process for new naturals, and respect that the time required for the transition will always vary from person to person. The transition may be 1 day or 100 days— and yes, there may even be a few relaxers applied in the process before the transition is completed and sticks. Yes, I said it! I transitioned to natural hair approximately 32,423,947 times in five years (okay, I’m exaggerating lol) only to throw in the towel each time before it finally stuck. Transitioning requires a mental alignment with the physical to hold, and I was only able to achieve this alignment by falling many, many times and getting back up again. (Donnie McClurkin would be proud, haha) “Weaning” may very well be the start of the transitioning process for some. It certainly was for me. All of these experiences were important to the process for me.

Transitioning gives the mind the necessary time to adapt and accept the coming changes. Think of transitioning like pregnancy. (Maybe this is not the best comparison— but work with me here!) The nine months of pregnancy give the mom-to-be a chance to get comfy with the idea of becoming a mother. The time gives mothers a chance to decide on names for the kid, how they’ll raise the child and how they’ll share their worldview with this new little person. The mom learns how to sacrifice some of her own comforts and some of her old ways of doing things for the benefit of another person. Some months are better than others, and she might have to field the occasional well-intentioned but “off” comment, but she learns about herself and her body. Just imagine if pregnancy were an overnight process and moms just woke up with a baby in their arms! Some would take right off and be just fine, others would certainly struggle with the new challenge. Transitioning can level the playing field between the two groups so that most do well.

Many times, the mind will hold the hair captive in the transition. But no matter what, it’s still important to give the mind the time it really needs to complete the process. When transitioners complain about tangles and breakage and all of the other things that tend to accompany transitioning, it’s easy for some well-seasoned naturalistas to tell them (often in love, but occasionally in disgust) to simply— “Just cut it off.” Now, this advice at face value is usually quite valid because just cutting it off will solve most of the physical problems with tangles and breakage from trying to reconcile two incompatible hair states. But this answer can be insensitive to the process that some new naturals need to experience to ensure that they are able to mentally stay the course. When new naturalistas chop before they are ready, the chances of them staying the course may be affected. So transitioning is more than just hanging on to hopeless hair. It’s more than just straddling the fence in a sea of indecisiveness and cowardice. It’s not a sign of weakness—for some inbetweeners, it’s a smart, strategic decision that will solidify their resolve going forward. For some, it’s an honest recognition that I’m still working on my alignment— or that I’m really not quite ready for a drastic change . . . yet. We must always remember to embrace one another and teach one another in love. No two paths are the same or more valid than the other, nor must they strive to be.

1 Bun 3 Ways!- Natural Hair Protective Styles

$
0
0

Tina Munzu writes:

Buns are fun and can take you from girl next door to sophisticated beauty in a second. Check out these 3 easy ways to rock a chic top knot bun. 

Watch Now!>>>


Curl Envy: 3 Ways it Will Ruin Your Hair Journey

$
0
0
 
 
by Kanisha of BlackNaps.org

Have you ever heard of “curl envy?” It’s a phrase in the natural hair community that describes the desire to have someone else’s hair/curl pattern instead of your own. Sometimes the phrase is thrown around jokingly when you just really like another girl’s hairstyle, but if you truly have curl envy, you may want to reevaluate your natural hair journey. Especially if you’re a new natural, curl envy can be a real threat to your hair journey.

Read On!>>>


It’s great to follow other naturals and have favorites who inspire you: this is a community, after all. But be careful not to start wishing you had someone else’s hair because this could easily translate over into how you treat your own hair. Here are some ways that curl envy can actually ruin your natural hair journey.

1. You’ll begin to hate your own hair.

One of the first signs of serious curl envy could be that you start to dislike your own curl pattern because you find another person’s curl pattern more desirable/admirable. And when you hate your hair, you won’t be inclined to treat your hair with love, which could ultimately result in damage. It’s important to learn and love your own hair, so spend time discovering what your hair likes and dislikes, instead of observing someone else’s hair more than your own.

2. You’ll try to make your curl pattern look like theirs.
Once you realize your curls just don’t act the way hers do, you may unknowingly find yourself doing anything to get your hair to cooperate the same way, from over-manipulating the hair to wasting money trying to buy the perfect product, and engaging in hair practices that only lead to damaged hair.

Refrain from using heat, henna, or even color as just a means to alter your curl pattern. All curl patterns and hair types are beautiful, so focus on embracing what you have. Your own hair is unique, beautiful, and worthy of the proper care and maintenance to allow it to reach its fullest potential.
 
3. You’ll have unrealistic expectations.
You have to spend time getting to know your hair in order to know what’s going to be the best routine for your curl pattern and texture. When you have curl envy, you may find that you have unrealistic expectations of how a certain style or product will make your hair look and feel.

It’s not good to base your expectations of your hair off of someone else’s because you’ll be let down every time. S0metimes even if you have the same curl pattern as another girl, your hair still won’t act like theirs because other factors are involved, like moisture, porosity, thick vs. fine hair, or even how much damage the hair may have suffered.

We always say that natural hair is not a one size fits all, so stay in your lane and take care of your hair. When you nurture your hair from the inside out, it will thank you for it.

Type 4 hair can be undoubtedly prone to dryness and breakage, but it’s no less beautiful. It’s kinky, coily, curly, and awesome, so love it, embrace it, and enjoy the journey. 

Weigh In!

Rehab Your Natural Hair After Using Heat

$
0
0


There are three hair treatments that all naturals should do post heat styling. These treatments add moisture back into the cortex of the hair strand, fill in any missing gaps in the cuticle, and increasing the hair’s elasticity.

Read On!>>>


Pre-poo

You might be thinking, why pre-poo my hair is straight and I do not have to detangle? Well, one of the main objectives of this process is to add moisture so when you shampoo all of the oils from the hair are not stripped. These are the key ingredients you should look for in your pre-poo:

Protein treatments

Your hair is made up of a protein called keratin. Whenever heat is used on your hair it can remove keratin. A protein treatment can temporarily replace the bond, which is commonly described as filling in the gaps on the hair cuticle. In order for a protein treatment to be effective, it must contain hydrolyzed proteins. The size of the protein must be small enough to attach to the hair shaft. There are four types of protein-enriched treatments:
  • Light protein treatments – Use on slightly damaged hair or routine treatments
  • Protein packs – Use on slightly damaged hair or routine treatments
  • Deep penetrating treatments – Use on moderately damaged hair
  • Reconstructors – Use on severely damaged hair
This step is very helpful but not always necessary for all naturals. If you are protein sensitive, you can skip this and proceed to the next step.

Deep conditioner

Deep conditioning can restore and maintain the elasticity of the hair. They are classified as deep due to the active ingredients ability to penetrate the cortex of the hair. Most deep conditioners require additional steps like longer wear and application of diffused heat from a hooded blow-dryer. The time required for the conditioner to be left on the hair and the additional heat increases the penetration of some ingredients into the cortex while helping other ingredients adsorb to the cuticle. Here is a list of ingredients that penetrate the cortex:
  • Hydrolyzed wheat protein
  • Hydrolyzed silk protein
  • Centrimonium bromide
  • Panthenol
  • Coconut oil
In most cases simply placing a plastic processing cap or grocery bag over your head while deep conditioning is enough heat to active these ingredients. Note that hair is dead and does not regenerate. Therefore, all protein treatments can only temporarily repair the hair shaft to help prolong the hair’s longevity before eventually needing a trim or cut.

Tracee Is Naturally Glam!

$
0
0

Tell me about yourself! 
Hello naturals!  My name is Tracee and I am from northern California.

What was your journey like?  
I started off as a straight natural, and I let my perm grow out for 18 months before I cut the rest of the perm off.  From then I was a straight natural for 8 years. Three big chops and three years later I am now a full blown kinky curly natural.

READ MORE>>
Before going natural I had very thick and strong hair.  There was nothing I could do to my hair that caused any serious damage or breakage.  However, since becoming a natural I have experienced a lot of hair loss and was even diagnosed with alopecia.  After I stopped using a certain cleansing shampoo and started taking hair vitamins my hair stopped falling out.


Had you always embraced your texture? 
I didn’t know what my hair was like until I went natural.  It was definitely a challenge trying to find the right products to use on kinky hair but overall I have embraced my hair texture.

How did family and friends react to your decision to go natural? 
For the most part I have had a positive response. There have been only a few comments as to why would I want to wear my hair nappy.

Describe your hair.
I have many different textures. I have thick, coarse, and fine hair that is low porous.

What’s the craziest thing you’ve ever done to your hair? 
I cannot say that I have done anything crazy to my hair…not yet anyway!


What’s your biggest hair related regret? 
I have no hair related regrets or regrets in life.  Every trial and error that I faced in my natural hair journey is a lesson learned and I am grateful.

What's your current hair routine?
My hair routine is fairly simply but time consuming.   I try to pre-poo my hair first with Aubrey Organics GPB mixed with an oil blend that I make (grapeseed oil, avocado oil, and jojoba oil).  Next I co-wash my hair 1-2 times a week using Carol’s Daughter Hair Milk Co-wash.  I then follow up with a conditioner.  I like to rotate different conditioners.  My favorites are Quidad Color Sense Conditioner, Deva Curl Conditioner One, and Aubrey Organics GPB Conditioner. On deep condition days I use Carol’s Daughter Marula Hair Mask (I love it) or Mixed Chicks Deep Conditioner.  After applying the deep conditioner I sit under the steamer (Huetiful Hair Steamer) for 30-45 minutes.  Once I’m done steaming my hair I let my hair cool for 10 minutes and then I rinse it out with cool water.  Next, I proceed with the LOC method (apply to hair a leave-in conditioner followed by an oil and then a styling cream).  I like to use Elucence Moisturizing Conditioner for my leave-in, then I use an oil blend that I make, followed by Deva Curl Heaven in Hair. Following this method will assure that my hair will attain moisture for several days. My final steps are applying either a curl cream or gel and then sealing my ends with an oil.  For a curl cream I use Quidad Hydrafusion Curl Cream and for the gel I use Uncle Funky Daughters Curly Magic.  Lastly (for real this time lol), I sit under the hair dryer for 30-45 minutes, shake my, and then apply Oyin Whipping Pudding.  Ok, my holy grail products are basically everything in my above hair regimen.


What’s your favorite hairstyle? Where do you get hairstyle inspiration?  
My favorite hairstyle is wearing my hair in a high bun or just a ponytail.  Now a days I seldom wear my hair pulled back because I do not want to put tension on my edges.  So I mostly wear my hair in a wash and go.  For hairstyle inspiration I usually go to You Tube.

Who is your curl crush? 
I have no specific hair crush. I am simply fascinated with every natural I come across.    

How do you maintain your hair at night?  
I moisturize my hair at night with a few different products.  I mainly use my coconut cream to oil moisturizer that I make (Kree Essentials Skin and Hair Products), Carol’s Daughter Marula Oil, or Oyin Whipping Pudding.  I then use a satin hair bonnet or LOC SOC scarf.  I do not spritz my hair with water before applying a moisturizer at night.  However, in the morning I use Oyin Juices and Berries spritz to replenish the moisture in my hair.

How do you maintain healthy length?   
I try to maintain healthy hair by getting my hair trimmed every six months (Deva Cuts for the past year and a half) and I deep condition my hair at least twice a month (my goal is every week). I deep condition by using a hair steamer.  My hair steamer is a must have.

What's the best thing about being natural?  
I honestly feel liberated.  Whether I wear my hair as a straight natural or kinky curly it’s one of the best decisions I have made to leave the creamy hair crack alone. I'm just saying!  I also enjoy sharing my story and sharing what latest product I have tried out.

Where can folks find you on the web?  
You can find me on Facebooks under Tracee Johnson or MsTeeJay71 on Instagram.  I would like to give a shout out to Revitalize Skin Care and Laser Spa where you can purchase my products, and Aten Media Group.

Why You Need Oils in Your Conditioner

$
0
0

 by Susan Walker of Earthtones Naturals

Conditioners formulated for textured hair will typically contain emollients and oils in a fairly high amount. This is because curly and coily hair tends to be drier than other hair types. Now when it comes to conditioners, there are so many types available, and each one has its specific attributes and benefits to the hair. For the purpose of this discussion I’ll refer to moisturizing conditioners since this is the type of conditioner most curlies will be using.

Moisturizing conditioners typically increase the moisture content of the hair, improve elasticity and manageability. They work to add and retain moisture in the hair. Now when we talk about your hair needing extra moisture that doesn’t mean oil. Hydration is a main characteristic of water so increasing water really means replenishing water to the hair, and preventing or minimizing it’s escape into the surrounding environment. So anything that is going to help improve water retention in the hair is ideal for dry textured hair. There are many ingredients that will help and emollients and oils are among them. Additionally, using oils in conditioners can help nourish the scalp.

Read On>>>

Which Oils Work Best in Conditioner? 


There are several opinions about which oils are best for hair and it’s really up to you which oils will work best for YOUR hair. However, there are some oils that seem to work better than others. Oils with low molecular weights or shorter fatty acid chains can penetrate the hair cuticle. These oils include:

  • coconut oil
  • murumuru butter
  • babassu oil
Other oils may be too long to penetrate into the cuticle, and sit on top of the hair coating it increasing slip, improving softness and manageability, and adding shine to the hair. All of these benefits can remain even when the conditioner is rinsed from the hair. These oils are good for sealing versus moisturizing. They include:

  • Jamaican black castor oil 
  • grapeseed oil 
  • jojoba 

For dry hair, oils are important for another reason. Porosity is a key factor in the ability of your hair to maintain moisture. The more porous your hair is the more water it can absorb. Seems like a great thing but there is a flip side to this – it will lose a lot of moisture over time as well. Overly porous hair can be corrected with specific steps. Additionally, conditioners that contain oils can help seal moisture into the hair strand better than those without and this is important for help to keep moisture in the hair.

Coconut Oil Versus Shea Butter 


The two oils that are commonly used are coconut oil and Shea butter. Coconut oil is fantastic and there is a lot of science behind its benefits to the hair. Some people have expressed that their often feels drier and tangled from coconut oil and the Natural Haven has this comment to make about this experience:
“The straw like feel some people find with coconut oil is usually related to using too much product because coconut oil is not as viscous as other oils . Hardening of the hair is related usually to temperature because coconut oil solidifies at a fairly low temperature so a cold winter breeze can stiffen hair very fast.”
I personally have no issues with using coconut oil in my hair, especially when it’s used with other conditioning ingredients in a formula. My hair is extremely soft, flexible and moisturized. If you’ve played around with coconut oil and have found no benefit to your hair then leave it out or try fractionated coconut oil instead. It’s coconut oil that’s had a number of fatty chains removed resulting in a very light weight oil that still offers great moisture to the hair.

Shea butter helps to moisturize your scalp. It may be able to penetrate the hair shaft to offer moisturizing and can create a light occlusive layer to prevent further damage. It also contains allantoin that will help with reducing inflammation and increasing cell regeneration on your scalp.

The key to using conditioners with oils is really knowing why they are in the product and how they will benefit your hair. They are there to improve the condition of your hair, not make it worse.

How do using conditioners with oils affect your hair? Do you love them or loathe them?

CN Says-
For Part 1 of this series, click HERE


This article was originally published on July 2013 and has been updated for grammar and clarity. 

Thicker Natural Hair with Biotin and Castor Oil? The Science.

$
0
0

by Erica Douglas aka SisterScientist 

Ladies, can we agree that we live in a world of hair envy? We constantly want what somebody else has, and want to know why our hair cannot do what her hair does. However, achieving those results (without hair extensions) may be physically impossible due to genetics, age, or health. Big, voluminous hair is all the rage, and whether or not you have it is often determined by your hair density and your hair width.

The Science Behind Your Hair Thickness
First, let’s clarify the difference between hair density and hair width.
  • Hair density measures the number of hairs in a given area of the scalp
  • Hair width measures the diameter of each individual hair strand
Before you start spending money on products that make claims to thicken the hair, first try to understand the cause of your thinning and become better informed on how products achieve these claims so that you can set realistic expectations. 


"Hair cannot grow or expand to become any thicker... It’s biologically impossible"

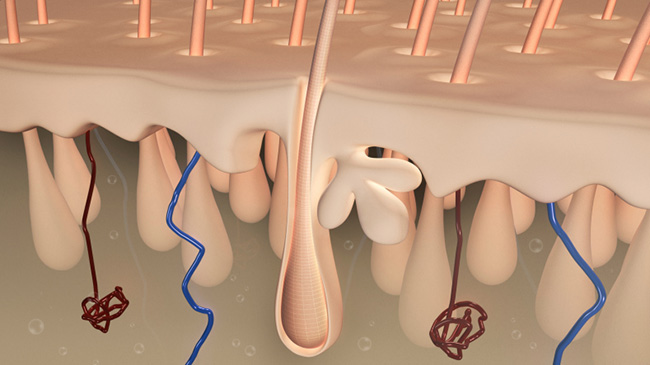
The thickness of a hair strand is ultimately determined by the diameter of the follicle. Once the hair has protruded from the follicle, the hair cannot grow or expand to become any thicker. It’s biologically impossible to do so because once the hair is out of the follicle, it’s a wrap – the hair is dead. The follicle is the hidden gateway in the dermis layer of the skin that produces the visible hair shaft that we are so obsessed with. At the very base of this follicle lives the papilla, the heart of hair formation, where blood vessels supply the nutrients to the cells that are naturally manipulated into strands of hair. This process is extremely important to the future outcome of the hair because the cells that are absorbing these vital nutrients contribute to the formation of the protein structure of the hair. Maximizing the nourishment to these cells helps to maximize the strength and durability of the protein matrix.

Before these cells become what we visibly know as hair, they must first take a journey through many layers of the follicle. It is during the course of this journey where the hair strand thickness is determined. As hair is pushed through the follicular layers, it undergoes a process called keratinization.


Keratinization: Where It All Happens
Keratinization is the process that occurs in which cells are hardened to form the protein matrix that produces the rigid structure of the hair shaft. It is during this hardening of the cells where the hair starts to take the shape of the physical boundaries of the follicle.

As the hair shaft hardens, it creates three layers: the cuticle (the outer most layer), the cortex (the middle layer), and the medulla (the core layer). The cortex primarily consists of rope-like proteins, such as keratin, and contributes to the bulk of hair thickness and inner strength. The cuticle is a thinner layer of protective covering to the cortex. The cuticle layer is made up of sheaths of cells (much like shingles on a roof) that overlap and are attached to the cortex at its base. The average human hair has seven to ten cuticle layers. Each cuticle layer is approximately 0.5 micrometers thick (1 micrometer = 0.0001 centimeter). The medulla is the thinnest layer. It is so small that it is often difficult to measure, and sometimes nonexistent in certain parts of the shaft.

THE POINT OF NO RETURN (OR THICKENING)

Once these three layers have hardened to form the hair shaft, this is the thickest your hair will ever be. I hate to say it, but the physical hair strand itself will progressively thin as it grows out of the scalp due to normal weathering from daily hair maintenance and exposure to the elements. As we comb and style our hair, we inevitably cause some level of damage to this cuticle layer, gradually chipping away at the surface. This is why you will often notice that your hair is thicker at the root than it is at the tip, because the hair at the tip has suffered through years of damage from daily hair maintenance. Of course you can always limit the damage the hair is subjected to by practicing healthy hair maintenance techniques and utilizing products that reduce physical damage, but you will never eliminate it.

The Truth Behind Thickening Hair Products
Now that you have been officially schooled on the science of hair thickness, I assume that you understand why it is biologically impossible for the physical hair strand to become thicker after it has emerged from the scalp. Therefore, it should make sense that products applied directly to the hair that promise to increase the thickness can only deliver the illusion of actual hair thickness. In order to physically grow thicker strands of hair, you would have to address the problem at the root (pun intended), but please understand there is nothing wrong with the illusion of thickness! We live in a world of instant gratification, so we often want results now. Lucky for us, products that provide these illusions of thickness can help us achieve many of our hair goals.


CASTOR OIL
One of the currently trending ingredients used in products that promise thicker hair is castor oil. There are a number of testimonials on the blogs that claim this method has achieved thicker hair. However, there is no scientific basis for these claims. After perusing through some of pictures, I believe that thickness could be misconstrued with hair density, as defined earlier. Improved hair density due to a castor oil treatment could be attributed to the lubricating of the scalp with an oil known to have anti-inflammatory and antibacterial properties, which can help clear up bacterial infested follicles. This can most likely be achieved with other oils such as rosemary or tea tree oil. In addition, it is often encouraged to lightly massage the oil into the scalp. A scalp massage alone could possibly stimulate blood circulation, which may help the flow of nutrients in the papilla. In this case, results would not be limited to the use of castor oil, but any product associated with a scalp massage or scrub. In my opinion, this all comes down to a personal preference.

DIY Castor Oil Experiment
If you truly want to see if castor oil makes a difference, use castor oil on one side of the scalp and a different oil on the opposite side where there is similar hair growth. Apply each oil using the same technique and monitor the results over time. Regardless of whether there is scientific proof or not, applying castor oil to the hair and scalp will not cause any adverse effects, so it’s at least worth a shot.

BIOTIN
Another popular ingredient attributed to thickening hair is biotin. What is biotin exactly? Biotin is a water-soluble vitamin found in the vitamin B complex that acts as a coenzyme to produce fatty acids and metabolize amino acids, which form proteins. It is naturally found in foods such as egg yolks, soybeans, nuts, and milk. Also, the body naturally produces biotin, which makes it extremely hard to have a biotin deficiency. Biotin is most commonly associated with ingestible hair and nail supplements. However, the scientific evidence available that supports biotin as an effective growth and thickness enhancer is weak. In addition, most experts believe that biotin cannot be easily absorbed through the skin due to the size of the molecule. Therefore, topical treatments are also thought to be ineffective.

What You Can Do to Thicken Your Hair

What is proven to enhance healthy growth and thicker hair are the following:

1. A HEALTHY, WELL BALANCED DIET
The nutrients from your body are a direct source for protein formation of hair strands. If you do believe in the power of biotin to help stimulate growth and thickness, then your best bet is to use it as a dietary supplement rather than a topical treatment because it will be introduced directly into the blood stream. Although formulations can leverage other chemicals to bind biotin to the surface of the hair cuticle, I believe that if there is any truth in the effects of biotin, it would be most effective internally.

2. INCREASE BLOOD CIRCULATION
This can be achieved through physical stimulation of the scalp or exercise.

3. A CLEAN SCALP
Maintaining a clean scalp by removing dirt and debris from the follicular cavity is ideal for growing healthy, thick hair. Incorporating anti-dandruff shampoos or scalp cleansers periodically into your regimen will help to ensure that anything clogging the follicles that could possibly constrain the diameter of the hair is extracted. If you believe you have a more severe medical issue, you should see a doctor who may prescribe medicated solutions.

Ultimately, we are limited by the boundaries of genetics to achieve a certain level of thickness. Also, as we mature, the follicular tunnel naturally becomes narrower, which in turn produces thinner strands of hair. We can always enhance thickness through the illusions of topical products, or add faux hairpieces to add volume. But if you truly want to achieve your maximum hair strand thickness, then I suggest that you start the process internally, at the root.

Source: [1] Randy Schueller and Perry Romanowski, “Inside the Hair: an Advanced Hair Biology Model,” in Hair Care: From Physiology to Formulation, ed. Angela C. Kozlowski (Carol Stream, IL: Allured Publishing Corporation, 2008), 72.

[1] Ibid., 73.

Erica Douglas, better known as Sister Scientist, is a formulating cosmetic chemist who earned her degree in Chemical Engineering from Stanford University. She has dedicated her career to developing quality and innovative cosmetic products, and has been the scientific mind behind brands such as ORS Olive Oil, Curls Unleashed, and HAIRepair. She is currently the Founder/CEO of mSEED group, a product development, manufacturing, and business consulting company that specializes in implementing brand innovation and growth strategies for new and emerging brands in the beauty space.
Viewing all 4836 articles
Browse latest View live


Latest Images